CoderDojo Sligo
Intro to Arduino – Week 5
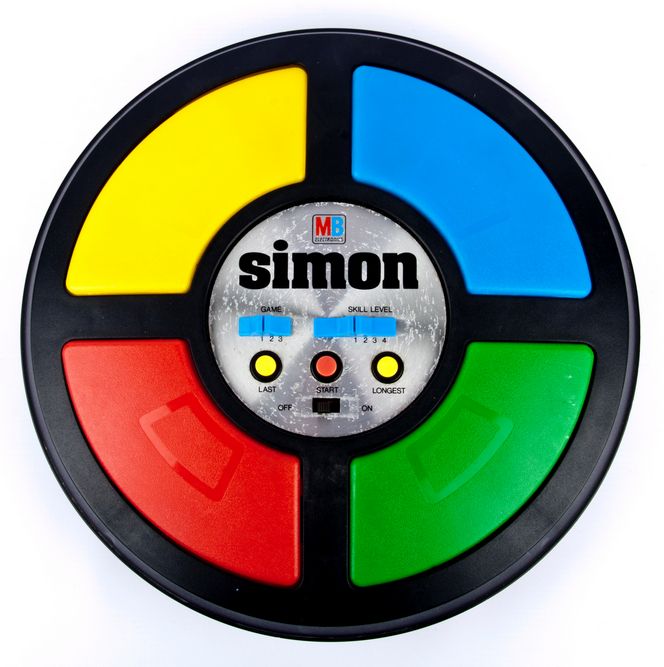
Simon Says
For the last two weeks of the Intro we will build and program a Simple Simon Says Game. Simon was one of the very earliest handheld electronic games and it first appeared in toy shops in 1978! It is still on sale today and has had multiple variations on its gameplay throughout the years, the latest includes touch swiping a la iPad.
The version that we will be creating for the Arduino will be a simplified version of the handheld unit but has the same basic operation. You press a button to begin a new game and the coloured lights come on in a sequence that you have to follow and match. If you get it right the sequence repeats but longer and faster. If you get it wrong it flashes all the lights and you start all over again.
The original game had sound as well as lights but this one doesn’t make any noise. There are other Arduino sketches available on the internet that use sound as well as lights and this sketch can easily be modified to add sounds.
The sketch and circuit that we will be building comes from the Arduino Scuola website. Scuola is Italian for School and this is a branch of the main Arduino website that aims to teach the concepts of Arduino circuits and programming.
Here is the link to the project page for Simple Simon Says.
And here is the circuit layout for you to follow –

Arduino Simon Says
And the code for the game is here –
/*This sketch is a simple version of the famous Simon Says game. You can use it and improved it adding
 levels and everything you want to increase the diffuculty!

 There are five buttons connected to A0, A1, A2, A3 and A4.
 The buttons from A0 to A3 are used to insert the right sequence while A4 to start the game.

 When a wrong sequence is inserted all the leds will blink for three time very fast otherwhise the
 inserted sequence is correct.

 author : Arturo Guadalupi <a.guadalupi@arduino.cc>
 Hardware needed:
 5x pushbuttons
 1x Blue led
 1x Yellow led
 1x Red led
 1x Green Led
 4x 1k resistors
 5x 10k resistors
 10x jumpers
 */

const int MAX_LEVEL = 100;
int sequence[MAX_LEVEL];
int your_sequence[MAX_LEVEL];
int level = 1;

int velocity = 1000;

void setup() {
  pinMode(A0, INPUT);
  pinMode(A1, INPUT);
  pinMode(A2, INPUT);
  pinMode(A3, INPUT);

  pinMode(2, OUTPUT);
  pinMode(3, OUTPUT);
  pinMode(4, OUTPUT);
  pinMode(5, OUTPUT);

  digitalWrite(2, LOW);
  digitalWrite(3, LOW);
  digitalWrite(4, LOW);
  digitalWrite(5, LOW);
}

void loop()
{
  if (level == 1)
    generate_sequence();//generate a sequence;

  if (digitalRead(A4) == LOW || level != 1) //If start button is pressed or you're winning
  {
    show_sequence();    //show the sequence
    get_sequence();     //wait for your sequence
  }
}

void show_sequence()
{
  digitalWrite(2, LOW);
  digitalWrite(3, LOW);
  digitalWrite(4, LOW);
  digitalWrite(5, LOW);

  for (int i = 0; i < level; i++)
  {
    digitalWrite(sequence[i], HIGH);
    delay(velocity);
    digitalWrite(sequence[i], LOW);
    delay(200);
  }
}

void get_sequence()
{
  int flag = 0; //this flag indicates if the sequence is correct

  for (int i = 0; i < level; i++)
  {
    flag = 0;
    while(flag == 0)
    {
      if (digitalRead(A0) == LOW)
      {
        digitalWrite(5, HIGH);
        your_sequence[i] = 5;
        flag = 1;
        delay(200);
        if (your_sequence[i] != sequence[i])
        {
          wrong_sequence();
          return;
        }
        digitalWrite(5, LOW);
      }

      if (digitalRead(A1) == LOW)
      {
        digitalWrite(4, HIGH);
        your_sequence[i] = 4;
        flag = 1;
        delay(200);
        if (your_sequence[i] != sequence[i])
        {
          wrong_sequence();
          return;
        }
        digitalWrite(4, LOW);
      }

      if (digitalRead(A2) == LOW)
      {
        digitalWrite(3, HIGH);
        your_sequence[i] = 3;
        flag = 1;
        delay(200);
        if (your_sequence[i] != sequence[i])
        {
          wrong_sequence();
          return;
        }
        digitalWrite(3, LOW);
      }

      if (digitalRead(A3) == LOW)
      {
        digitalWrite(2, HIGH);
        your_sequence[i] = 2;
        flag = 1;
        delay(200);
        if (your_sequence[i] != sequence[i])
        {
          wrong_sequence();
          return;
        }
        digitalWrite(2, LOW);
      }

    }
  }
  right_sequence();
}

void generate_sequence()
{
  randomSeed(millis()); //in this way is really random!!!

  for (int i = 0; i < MAX_LEVEL; i++)
  {
    sequence[i] = random(2,6);
  }
}
void wrong_sequence()
{
  for (int i = 0; i < 3; i++)
  {
    digitalWrite(2, HIGH);
    digitalWrite(3, HIGH);
    digitalWrite(4, HIGH);
    digitalWrite(5, HIGH);
    delay(250);
    digitalWrite(2, LOW);
    digitalWrite(3, LOW);
    digitalWrite(4, LOW);
    digitalWrite(5, LOW);
    delay(250);
  }
  level = 1;
  velocity = 1000;
}

void right_sequence()
{
  digitalWrite(2, LOW);
  digitalWrite(3, LOW);
  digitalWrite(4, LOW);
  digitalWrite(5, LOW);
  delay(250);

  digitalWrite(2, HIGH);
  digitalWrite(3, HIGH);
  digitalWrite(4, HIGH);
  digitalWrite(5, HIGH);
  delay(500);
  digitalWrite(2, LOW);
  digitalWrite(3, LOW);
  digitalWrite(4, LOW);
  digitalWrite(5, LOW);
  delay(500);

  if (level < MAX_LEVEL);
  level++;

  velocity -= 50; //increase difficulty
}
The code is much longer than previous examples we have seen and it introduces some new concepts that we haven’t seen before such as Custom Functions, ARRAY variables, FOR loops and decision making with IF statements. Don’t be put off by the length of the sketch as we will talk about how these new concepts actually help simplify our code and allow us to put logical structure into the programming.
Week 6 will continue with the game as we dive into the coding and try and work out how we could modify it to add in other elements to the gameplay.
Intro to Arduino – Week 4
Welcome back. This week we will be using Servo’s. Servo’s are a special type of motor that can be very accurately controlled by the Arduino. Unlike ordinary motors that spin round and round, Servo’s can only (usually) rotate 180 degrees. This may not sound very useful but the ability to set the position of the Servo arm to any desired position instantly is useful in all sorts of applications from locking mechanisms to robot arms to gauges.
Servo’s require extra software to be able to use them within the Arduino IDE. This software is called a Library. The Arduino IDE comes with some extra Libraries built in but others can be downloaded and installed to make other pieces of electronic hardware function. Luckily the Servo Library comes installed with the Arduino IDE software, all we have to do is include it in our sketch.
We will start with one of the example sketches that is built into the Ardunio IDE software you will find it under Examples > Servo Library > Knob.
Here is the Sketch.
// Controlling a servo position using a potentiometer (variable resistor)
// by Michal Rinott <http://people.interaction-ivrea.it/m.rinott>

#include <Servo.h>

Servo myservo;  // create servo object to control a servo

int potpin = 0;  // analog pin used to connect the potentiometer
int val;    // variable to read the value from the analog pin

void setup()
{
  myservo.attach(9);  // attaches the servo on pin 9 to the servo object
}

void loop()
{
  val = analogRead(potpin);            // reads the value of the potentiometer (value between 0 and 1023)
  val = map(val, 0, 1023, 0, 179);     // scale it to use it with the servo (value between 0 and 180)
  myservo.write(val);                  // sets the servo position according to the scaled value
  delay(15);                           // waits for the servo to get there
}
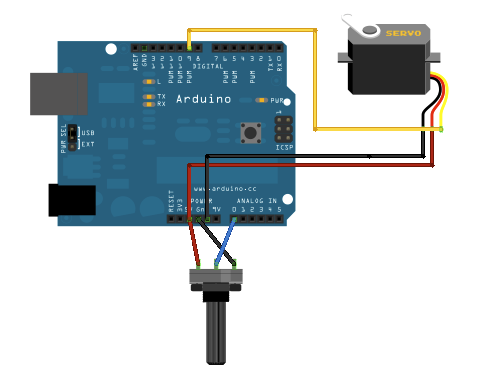
Above is the circuit layout for the sketch. We will build upon this and create a temperature gauge rather like an old fashioned barometer.
Lastly – two other things – Firstly Arduino have released a new version of the Arduino IDE version 1.6. If you haven’t done so already go ahead and update your software now. Download here.
Secondly, Arduino have made March 28th into Arduino Day. There are lots of events happening around the world to celebrate making and learning with Arduino and lots of stuff going on online too via the website and Twitter. Check out the Blog page for more info.
Intro to Arduino – Week 3
This week we will use Light Dependent Resistors (LDRs) to control the switching off or on of an LED.
This is the type of automatic switching that happens with Security Lights that turn on at Dusk and off at Dawn.
Here is the sketch.
// pin assignments
 int LED = 13;
 int LDR = 0;

 // variables
 int base;
 int threshold = 200 ;

 // declare inputs and outputs
 // and take a baseline reading
 void setup() {
   pinMode(LED, OUTPUT);
   base = analogRead(LDR);
   Serial.begin(9600);
 }

 // read from the analog input connected to the LDR
 // and print the value to the serial port.
 // the delay is only to avoid sending so much data
 // as to make it unreadable.
 void loop() {
   int liteLevel = analogRead(LDR);
   int x = (liteLevel-base);
   Serial.println(liteLevel);
   Serial.println(x);
   if (x < threshold) {
     digitalWrite(LED, HIGH);
   } else {
     digitalWrite(LED, LOW);
   }
 }
And here is the circuit diagram (note the Resistor value is 1K ohm)
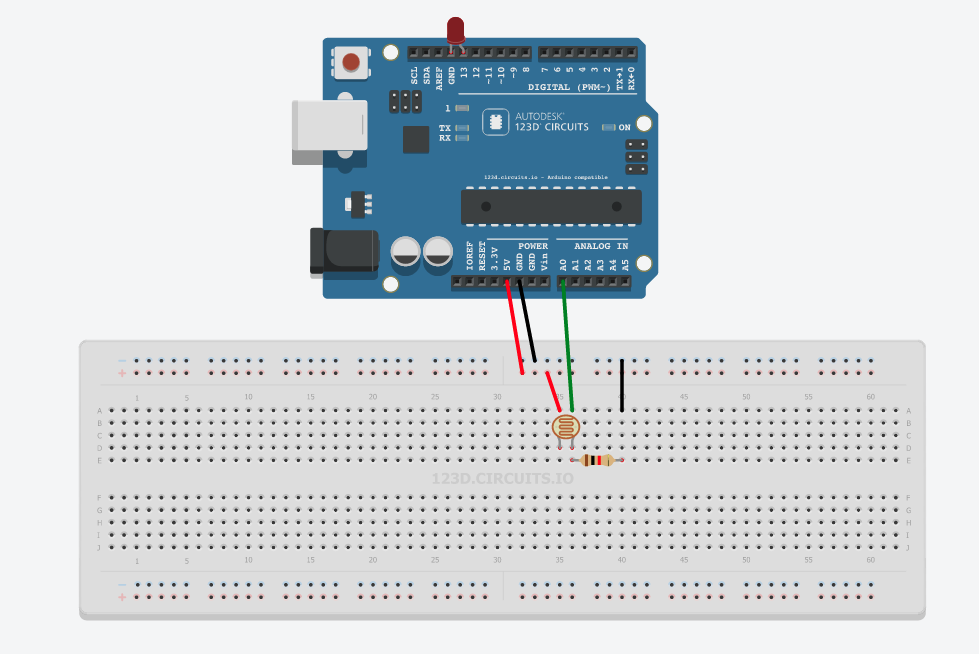
Lastly here is a link to the Circuit and Code on 123DCircuits.com – LDR SWITCH
This is a fantastic website by Autodesk that allows you to create virtual circuits and upload code to a virtual Arduino and test that it works before making it for real.
The website requires a free login that you can create here